Showing posts with label Cooking/Recipes. Show all posts

{Recipe} Applesauce Granola

Have you checked the price of granola at the grocery store lately?  Ridiculous!  

Most recipes use either an oil or a sugar as the binder.  When I was growing up, my mom made her own granola using honey as the binder.  However, this recipe uses applesauce, a much healthier alternative.

Since I have been canning my own applesauce (with no added sugar or flavorings) for a few years now, this is not only a healthy recipe but a very cost-effective one for my family.  I use quick oats (because that’s what I always have on hand) and whatever combination of nuts and seeds I have on hand (which usually coordinates with what went on sale at the grocery store).  Usually 4x the recipe will last me a month or so.

I hope you enjoy this granola as much as I do!
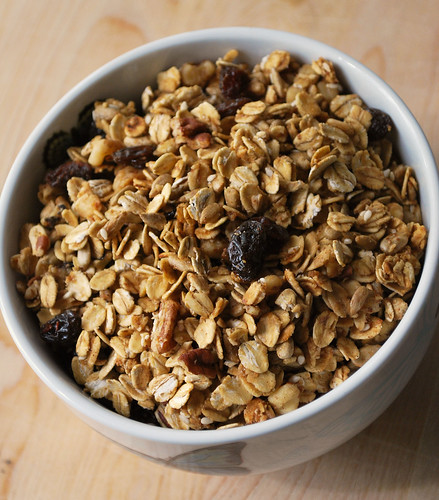
 

Applesauce Granola
Source: Fake Ginger

  • 2 1/2 cups old fashioned oats
  • 1 cup nuts (pecans, walnuts, almonds)
  • 1/2 cup sunflower seeds
  • 1/4 cup sesame seeds
  • 1/4 cup brown sugar
  • 1 teaspoon cinnamon
  • 1/2 teaspoon salt
  • 1/2 cup unsweetened applesauce
  • 1 tablespoon honey
  • 1 tablespoon vegetable oil
  • 1/3 cup raisins
  1. Preheat oven to 300F.
  2. In a large bowl, mix together oats, nuts, sunflower seeds, sesame seeds, brown sugar, cinnamon, and salt. Set aside.
  3. In a small saucepan, warm the applesauce with the honey and oil over low heat.
  4. Mix the applesauce mixture into the oat mixture and stir to coat everything. Spread the mixture onto a 9 x 13 baking pan.
  5. Bake for 45- 50 minutes, stirring every 10 minutes, until the granola is a deep brown. Remove from oven and stir in raisins. Cool completely before enjoying.

{Recipe} Strawberry-Lemonade Muffins


These are seriously good! Or as they say in the South, these are seriously good y’all! (I decided to address you in the Southern fashion since this recipe comes to us courtesy of Southern Living; it’s only right.)

The morning I made these for breakfast, the girls were in heaven. They were such a hit I brought them to the last day of Bible Study to share at brunch. And now that I’m typing this I realize I have strawberries in the fridge right now. Hmmm…. I think some are destined to be turning into muffins.

Strawberry-Lemonade Muffins
  • 2 1/2 cups self-rising flour
  • 1 1/4 cups sugar, divided
  • 1 (8-oz.) container sour cream
  • 1/2 cup butter, melted
  • 1 tablespoon lemon zest
  • 1/4 cup fresh lemon juice
  • 2 large eggs, lightly beaten
  • 1 1/2 cups diced fresh strawberries
1. Preheat oven to 400°. Combine flour and 1 cup sugar in a large bowl; make a well in center of mixture.

2. Stir together sour cream and next 4 ingredients; add to flour mixture, stirring just until dry ingredients are moistened. Gently fold strawberries into batter. Spoon batter into lightly greased 12-cup muffin pans, filling three-fourths full. Sprinkle remaining 1/4 cup sugar over batter.

3. Bake at 400° for 16 to 18 minutes or until golden brown and a wooden pick inserted in center comes out clean. Cool in pans on a wire rack 1 minute; remove from pans to wire rack, and cool 10 minutes.

{Recipe} Rosemary-Ranch Chicken Kabobs

People, I am here to tell you that this recipe….

WILL CHANGE YOU LIFE.

Seriously, this is the best chicken kabob ever.

My friend Lisa introduced it to me awhile back and I have to admit, as much as she raved about it, it took me awhile to get around to trying it out.  Shame on me!  It has now become my go-to staple for “how I cook chicken on the grill.” 


Rosemary Ranch Chicken Kabobs
Source:  The Sisters Café

1/4 cup ranch dressing
1/4 cup olive oil
2 Tb Worcestershire sauce
1 tsp dry rosemary
1 tsp salt
1 tsp sugar
1 tsp white vinegar
fresh ground pepper to taste
3 boneless/skinless chicken breasts, cut into pieces

Stir together marinade ingredients. Place chicken in bowl and pour marinade over – make sure all the chicken pieces are coated. Cover and refrigerate for 30 minutes.

Preheat grill to med-high heat. Thread chicken on metal skewers and discard marinade. Lightly oil grill grates. Grill kabobs for 8-12 minutes or until no longer pink in center and juices run clear.

{Pinterest} Recipes

One thing I have learned during my time using the Pinterest website – I am a visual person.  Duh!  OK, so I already knew that, but one of my favorite boards is my Recipes board.  Just having pictures only a glance away makes trying new recipes easy-peasy.  Here’s a few news ones that I have tried – and liked – recently.

Chipotle Chicken Taco Salad


The creaminess of the dressing was uber-yummy (sour cream makes everything yummy, doesn’t it?) and I do love a good dinner salad.  (Kinda like a good sandwich for dinner.)  I used the prescribed amount of chipotle pepper (just a bit) but the dressing definitely had a kick; I wouldn’t serve it to people or kids who are spice sensitive.  I think this would be really good tossed with the Café Rio dressing too.   

Man-Pleasing Chicken

Well, I think this pleased my man, ha ha ha!  The combination of Dijon mustard and maple syrup was fabulous (I also love rosemary), and finding another way to cook chicken pieces (which seem to be universally on sale) was awesome.  I can never have too many of those.    

Mongolian Beef

I made this for dinner one night, accompanied by scallion pancakes and it was to die for.  Seriously, it was so tasty I licked my bowl (I really did!)  And the recipe couldn’t be easier to make.  I used a cut of beef tenderloin because that’s what I had on hand, but I think it would be good with just about any type of beef you had on hand.  Definitely a keeper!

Enchilada Sauce

One night I wanted to throw some enchiladas together, but didn’t have any enchilada sauce on hand.  In this day and age of finding anything I need on the Internet, I just hopped on and started digging around.  I ended up with this recipe, which I threw together and used with stuffed tortillas that night.  It worked beautifully.  No need to buy canned enchilada sauce anymore!

Yummy Recipes to Share

In case your mealtime routine could use a refresher course, I thought I would share with you some yummy recipes I have made recently and loved!

Bread Machine Crescent Rolls
I made these last night to go along with Ham & Bean Soup (yes, I know it's not winter, but I had a ham bone in the freezer taking up some valuable real estate).  They were the perfect accompaniment.  So soft and light.  My mouth is drooling again thinking about them.

Semi-Homemade Salsa
I say "semi-homemade" because the base is canned tomatoes.  I ran out of self-canned salsa (can you believe it?!) and had lots of cans of tomatoes running around (from before I canned my own) so I decided to try this recipe out.  Oh boy, was it good!  I plan on using it later in the week on tacos, but Elliott and I couldn't help ourselves last night and polished off half of it (along with half a bag of chips).  If you can't have fresh from the garden, this is a pretty darn good substitute.

Ranch Potato Cubes
I have made these a couple of times now and they are always a hit.  I only make them when we have guests over because the recipe makes a larger pan than I would like to have around for just our family.  I love the simplicity (not the healthiness, mind you) of the ingredients; I usually have the items on hand.  But they can be addictive; don't say I didn't warn you!

Quickie Stickie Buns
I made these one morning because 1) I have had this recipe running around forever (I can tell by my handwriting it originated in high school) and 2) I had some time to make them while girls watched Sesame Street one morning.  If you don't have time to make full-on cinnamon rolls, try this recipe.  Under one hour and just as good when re-heated and eaten throughout the week.  I will admit that after the first day I didn't share anymore with the girls; momma needed it all to herself.

Cafe' Rio Pork and Dressing Recipes

I told all of you that my meal plan for the rest of the month included Cafe' Rio Pork Salad with Cafe' Rio Dressing.  Yummo!  For those of you not living in the West, you are missing out.  Until now!  Here are the recipes to make your own version at home.  I build my salad kinda like they do at Cafe' Rio - lettuce, beans, rice, pork, dressing.  You can also add guacamole, sour cream, pico, salsa, etc.  Seriously, seriously delicious.  I am currently enjoying a tummy full of it.  Enjoy!

Shredded Cafe Rio Pork

3 lbs pork
16 oz. bottle of chunky salsa (use blender so chunks are gone)
1 can Coke or Dr. Pepper
1 cup brown sugar

Place all ingredients in a crock pot and cook on low for 6-8 hours. Shred pork with forks. Leave it on low until ready to serve.

Café Rio Dressing Recipe
1 package Hidden Valley Ranch seasoning packet
1 cup mayo (light mayo, or plain low fat yogurt)
1 cup cilantro, chopped
2 cloves garlic, chopped
3 tomatillos, peel off paper and chop
1/2 cup buttermilk, to consistency you want
Mix all ingredients together in blender/food processor.

Purple Yogurt


What do you do when you are overrun by Grape Kool-Aid (picked it up free from somewhere back in the day) and a bit of leftover plain yogurt ready to turn?  Put them together of course!

Actually, surprisingly yummy (if you can get past the color which is probably the most appealing part to little kids).  Next time I probably wouldn't add a whole packet of Kool-Aid to a small amount of yogurt and you need a bit of sweetener if your Kool-Aid isn't already sweetened (I don't think any of it is, do you?)

The verdict:


SCORE!

Yogurt Update

I just had to tell y'all about the last batch of yogurt I made; it's getting even better.

This time I used powdered milk, halved the recipe (used only 4 cups), and when it came time to mix in the live yogurt culture I also added 1/4 c. Splenda (to thicken) and 1 T. milk powder (to thicken).

Although the yogurt is still to thin and sticky a consistency for our taste (I strain it in a coffee filter to thicken it up), the addition of Splenda had Lily eating it and knowing I could use the same recipe for half the amount was refreshing, because it was becoming a struggle to eat all of the yogurt up.

Next time I will be experimenting with other more natural sweetners, like honey. Can't wait!

Crunchy Dijon Salmon


Crunchy Dijon Salmon
(from Cooking Light)

6 (4 oz) salmon fillets
In the past I have always used fresh salmon from the grocery store, but this time I thawed out some salmon which I had gotten on sale and frozen.  It tasted just the same, so I learned I am no longer scared of frozen salmon.

salt and pepper to taste

3 T. whole grain Dijon mustard
I used some old Sweet Hot Mustard that was in a little Hickory Farms container and I had been wondering what the heck to do with it for over a year!)

1/2 c. panko crumbs

Preheat oven to 450. Sprinkle fillets with salt and pepper; spread mustard over tops and sides of each fillet. Press breadcrumbs onto each fillet. Place fillets on a lightly greased wire rack on an aluminum foil-lined baking sheet. Bake 12-15 minutes or until fish flakes with a fork.

Verdict: Super yummy and easy easy easy!  Preparation takes 5 minutes, so dinner in under 30 minutes.  I like that!


Homemade Yogurt

After posting my goings-on to Facebook, I received alot of interest in my latest venture: homemade yogurt. So I decided it deserved its own blog post.

I had been interested in making my own yogurt for awhile now but never screwed up the courage to try it. So with the Eat From Your Pantry challenge in front of me as well as the start of a new year (and new resolutions on my part, which you will see on the 1st), what better time to try?

I first read about the process of making yogurt in your Crock Pot on the Crock Pot Lady's blog (yep, that's what she's called around the blogosphere). Since this week is a slower week with no preschool, Toddler Time music class, or Bible Study it was the perfect week to try. After reading the recipe instructions I realized I only need milk and a small container of yogurt, so I decided to try and make this batch organic in keeping with one of my 2010 resolutions. Popped over to the grocery store and we were all set.

I started the process on Tuesday morning, and let it sit for the requisite timings following all of the instructions. I put it in the fridge that night and dished some up for us this morning. Voila! It turned out just like, well, yogurt.

I transferred the contents of the Crock Pot to a plastic container and will simply dish out what we need per meal. I also plan on adding bits of fruit (from our home canned collection) to each batch individually so as to add variety (and follow the suggestion of the Crock Pot Lady who let me know that if you mix it up all at once it changes the consistency).

There are a couple of things I am going to try next time:

1. Sweeten it. It's plain yogurt with no added sweeteners and my girls weren't too keen on that. The adding of fruit helps, but I think I still need a little something extra. I am going to read all of the comments on the Crock Pot Lady's blogpost to see if anyone else had success adding it to the main mix. If not, I will just add a bit to each bowl when I add the fruit.

2. Thicken it. My yogurt was a bit watery for the girls (I prefer a bit thicker consistency so as to make it a bit less messy for them). One of the comments on the blogpost suggested adding a packet of gelatin when you mix the yogurt starter in, so I plan on trying that. I have several packages of gelatin, so it will be a good use of it. In the meantime I am doing this:

Draining the yogurt using a coffee filter. And since I only have little filters, I am doing it in batches. The texture when done is like thick Greek yogurt, so I think mixing it back in with the regular, less dense yogurt will give me the texture I am looking for.
Verdict: This was super easy. So easy in fact I don't know why I didn't try it before! (How many times have I said that to myself?) Now I will be looking for all sorts of fun ways to use it up. And when you figure in the cost analysis (which is on the Crock Pot Lady's post) it is insane how much cheaper it is to make your own organic yogurt. What a great way to head into 2010!

Recipe: Pasta with Sausage and Butternut Squash

I know I should be posting further stories and pictures of Ava's birthday, but I have to share this first. My friend Lisa made this recipe for a girl's lunch last year and I have waited anxiously for butternut squash to come into season. I picked one up at the Farmer's Market in Utah last weekend in order to make this very dish! So yummy!

PASTA WITH SAUSAGE AND BUTTERNUT SQUASH


12 oz. sweet Italian sausage links, casings removed
(I actually used regular pork sausage since I had it on hand and Lisa says you can also use bacon or turkey sausage. If you use turkey make sure to add some extra spices.)

16 oz. corkscrew pasta

1 medium butternut squash (about 1 3/4 pounds), peeled and cut into 1/2" chunks

1/4 t. pepper

1/4 t. salt

1/4 c. grated Parmesan cheese


In a nonstick 12" skillet, cook sausage over medium-high heat until browned, about 7 minutes, stirring frequently with spoon to break up sausage. With slotted spoon, transfer sausage to bowl discard all but 2 T. drippings from skillet. Meanwhile, in a large saucepot, prepare pasta in boiling salted water as label directs. To drippings in same skillet add squash, pepper and salt. Cook, covered, over medium heat, about 10 min. or until squash is tender, stirring occasionally. Drain pasta, reserving 3/4 c. pasta cooking water. Return pasta to saucepot; toss with sausage, squash, Parmesan, and reserved cooking water.

Favorite Recipes

Here's a couple of yummy recipes I would like to share with you. I just tried the homemade fish sticks for the first time this week and they were so good! They tasted better than frozen and I felt like they were also healthier, because I am sure the girls were actually eating more fish per stick than the frozen kind. We even ate them last night as leftovers and they were still yummy heated up.

Also, here are the salsa recipes I use, courtesy of Momma Kay. When I am fortunate to have a bunch of tomatoes fall into my lap (usually courtesy of, naturally, Momma Kay's garden) I make the fresh salsa recipe. Then, when we have eaten all we can eat I will can the rest, adapting her canned salsa recipe. Basically, in order to hot water bath can the fresh salsa recipe you need to up the acid, so I do this by adding extra lime juice; I also then tweak the spices too. But you can experiment to get the taste you like.

HOMEMADE FISH STICKS
3/4 c. flour
1 t. dr. mustard
salt and pepper to taste
1 c. buttermilk
1 egg
1 lb. tilapia or halibut, cut into strips (not too thick so they cook more evenly)
3 c. panko bread crumbs (I don't measure, just add more when needed)
Oil for frying

In a large bowl, mix flour, mustard, salt and pepper; add buttermilk and egg. Coat fish in egg mixture then bread in crumbs. In a pan, heat oil on medium heat. Saute' fish in batches, about 5 minutes, turning halfway.

FRESH SALSA
6-8 c. medium tomatoes, peeled and chopped
1 large onion, minced (about 1 c.)
2 Jalapeno peppers, seeded and minced
2 Anaheim peppers, seeded and minced
1/4 t. garlic powder
2 T. brown sugar
2 T. vinegar
2 t. salt
1-2 small cans tomato sauce
Fresh cilantro, finely chopped (to taste, about 1/4-1/2 bunch)

Mix and serve with chips.

CANNED SALSA
Start with a batch of fresh salsa (recipe above). Then add:
3/4 t. dr. oregano
3/4 t. cumin
1/8 c. lime juice
1 can tomato paste
1 T. salt

Bottle in pint or quart jars. Process in hot water bath for 30 minutes.

If you have a favorite salsa recipe - or any recipe for that matter - I would love to swap! Email me your recipe at sarahkay (at) cox (dot) net.

Brownies Plus+

Inspired once again by Bakerella (seriously, the most ingenious woman ever; remember the cake balls I told you about?) I tried her new recipe which uses two ingredients I seem to have coming out of my ears at the moment (thanks to practically free sale items at the store): brownie mix and a cookie mix pouch.

Although Bakerella used chocolate chip cookie mix, I decided to try peanut butter to make the flavor combination Elliott likes most. You just mix each one per the package instructions then drop the cookie mix into the brownie mix and bake. You can view the full recipe here on Bakerella. YUMMY!


Recipe - Fake Jambalaya

I adapted this recipe from Martha Stewart, who of course made it the real way with fresh tomatoes, long grain rice, andouille sausage and cayenne pepper. I don't like spicy things, so I substituted summer sausage and paprika (to keep the color) nor did I like all the work of cutting up the tomatoes, so I substituted canned tomatoes. Maybe you will like this too!

~~~

Fake Jambalaya

1 T. oil
1 green pepper, diced
1 med. onion, diced
3 stalks (or more) celery, diced
2 garlic cloves, minced
2 t. paprika
14.5 oz. can diced tomatoes, NOT drained
2 c. instant rice
1 c. water
1 lb. med. shrimp, deveined and peeled
9 oz. summer sausage, sliced and halfed

Heat oil in large skillet (in needs to be large). Add green pepper, onion, celery, and garlic; season with salt and pepper. Cook, stirring occasionally until onion begins to soften, 5-6 minutes. Stir in paprika; cook until fragrant about 1 minute. Add tomatoes, rice and water to skillet; cover and simmer until rice is cooked and water is absorbed. Add shrimp and summer sausage to skillet and cook covered until shrimp are opaque, about 3-4 min. Remove from heat and serve hot.

Soup/Stock Update

So I would say that on the frugal end of my experiment, it was a success. I made (wait for it...) - 4 GALLONS OF STOCK AND 4 GALLONS OF SOUP! Yeah, I said GALLONS! I don't know what the heck I was thinking except that I am ambitious and I didn't realize it would make that much. All of that for under $20. So not too bad. Now when I am going to sneak all that soup into Elliott? Hmm...

Things to Do With All of My Stash...

Thanks to a posting on CFO: Chief Family Officer I came across the Betty Crocker webpage which helps you transform your pouch and box mixes into something special. Since I seem to always be buying things like this when they are on sale (and hence insanely cheap/free and how can I not take them home?) I am going to have to try a lot of these. First up I think - Buckeye Delights. Happy cooking everyone!

Canning Peaches - Part II

I didn't get around to the peaches until Friday. When I picked up the box on Monday they weren't ripe enough, so I let them sit this week. I forgot to take a picture during the process, but here is a lovely picture of the finished canned product.

This week I have felt like a squirrel getting ready for winter (although here in Vegas winter will be a blessing; we are all going a little stir-crazy cooped up in the house during the heat wave). Besides 10 quarts of peaches this week I have also canned or frozen:

  • 4 quarts pears
  • pureed peaches for Lily, cut-up peaches for Ava
  • dozen bunches of pureed spinach for cooking
  • 10 cups of strawberries
  • dozen bunches of green onions
  • 4 quarts salsa
  • pureed carrots for Lily

Whew! Makes for some full days, but I do feel like my most productive when it is all done knowing that I have done what I could to be a good steward and support my family the best way I can.

WFMW: Dip for Kids

Ava is on a kick right now where she must put dip on everything, and I do mean everything - the other day she was trying to dip individual pieces of rice. Now, I admit that the level of fun my kids can have is sometimes directly related to the level of work it creates in my laundry room, so I am not a fan of ketchup. And I am not too thrilled about using Ranch dressing at every meal because it isn't that nutrious. So this past week I created our own Ranch dip, using plain yogurt and Hidden Valley seasoning. It is a HIT! I even think it is super yummy, plus Ava is getting some hidden calcium at every meal. Win-win.

Works For Me Wednesday: The Five-Ingredients-Or-Less Edition

I have been inspired, thanks to Rocks in My Dryer, to start posting Works For Me Wednesday, as I love reading all of the other really great ideas shared each week (she has to cut it off at 300!). Even if I don't get to post on Rocks in My Dryer, I thought I would pass along my WFMW tips to my own readers.


This week we have been encouraged to share our simplest recipes so we can get the heck out of the kitchen. Immediately I thought of my go-to for biscuits/shortbread/shortcake, Easy Biscuit Squares. It only takes 3 ingredients:

1 c. yellow cake mix
3 c. Bisquick
3/4 c. water

Mix ingredients together in bowl. Turn onto floured surface and knead a few times until dough comes together. Shape and put into 8x8 pan. Score the top to make 9 squares. Bake at 425 degrees for 12-15 min. or until golden brown. Break biscuits apart at score marks.

And while we are on the subject...

I can't believe I forgot to tell you about the awesomeness of Cupcake Pops! I first saw these on The Martha Stewart Show, so I jotted down the baker's blog, and you will see it on my list to the right - Bakerella. Well of course Martha Stewart has to make things from scratch (thanks Bakerella for telling me you don't have to!) and I skipped the part about shaping the balls and putting them on sticks (I rolled them into balls and dipped them in chocolate bark, that was it), but what I ended up with was magical. It tastes like a decadent bob-bon and all it takes is a chocolate cake box mix and tub of cream cheese frosting. Bakerella has been doing several variations on them since and I love her ideas. You have to check them out!